Dashboard in Odoo | Creating custom dashboard
Using just an XML file and no JavaScript functions, we can easily create a dashboard in Odoo. With Odoo’s board model, we can create dashboards easily for our modules.
For the sales module, we are going to create a simple dashboard. To begin, we’ll create a simple module called simple_dashboard. Within the manifest file, add the dependencies for base, sale, and board, and within the XML file, add views.xml.
'depends': ['base',
           'sale',
           'board'],
'data': [
   'views/views.xml',
],
The next step will be to specify the views used inside our dashboard. We will use our already defined graph view, pivot view, and calendar view to visualize our sales data. If you would rather, you can create your own view based on your requirements and preferences. The next step is to define the action window.
<record id="action_sale_order_graph" model="ir.actions.act_window">
   <field name="name">Sale Order Graph</field>
   <field name="res_model">sale.order</field>
   <field name="view_mode">graph</field>
   <field name="view_id" ref="sale.view_sale_order_graph"/>
</record>
<record id="action_sale_order_calendar" model="ir.actions.act_window">
   <field name="name">Sale Order Calendar</field>
   <field name="res_model">sale.order</field>
   <field name="view_mode">calendar</field>
<field name="view_id" ref="sale.view_sale_order_calendar"/>
</record>
<record id="action_sale_order_pivot" model="ir.actions.act_window">
<field name="name">Sale Order Pivot</field>
<field name="res_model">sale.order</field>
<field name="view_mode">pivot</field>
<field name="view_id" ref="sale.view_sale_order_pivot"/>
</record>
It has created a record for each view using the ir.actions.act_window model. In this record, we provide the record name, res_model (in this case sale.order), view_mode, and view_id. To get the view_id, go to the corresponding view and inside the developer tools, go to the Edit View:….., From there we can get our external ID, which is our view_id
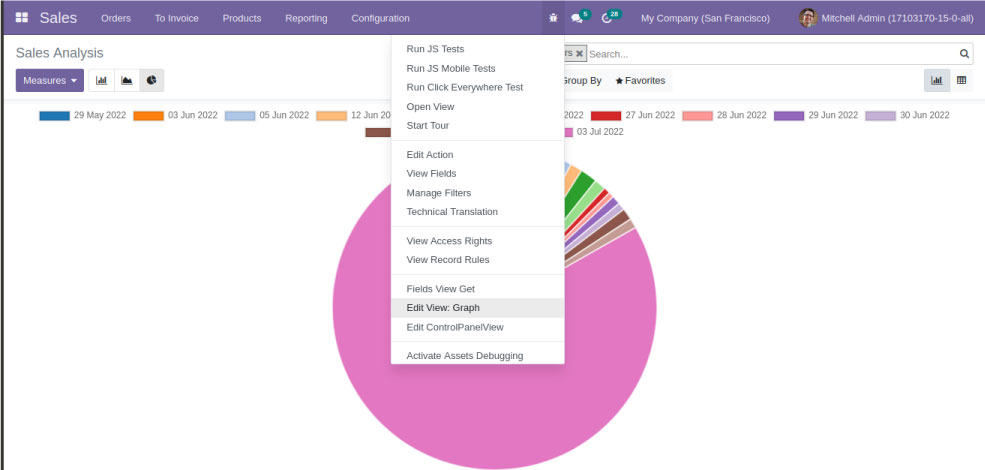

Similarly, we can get the view_ids for all views that we will use inside our dashboard.
Dashboard in odoo
We will now define the dashboard’s view.
<record model="ir.ui.view" id="simple_dashboard_view">
   <field name="name">Simple Dashboard</field>
   <field name="model">board.board</field
 <field name="type">form</field>
   <field name="arch" type="xml">
       <form string="My Dashboard">
           <board style="1-1">
               <column>
                 <action name="%(simple_dashboard.action_sale_order_calendar)d" string="Sale Orders"/>
               </column>
               <column>
                 <action name="%(simple_dashboard.action_sale_order_graph)d" string="Sale Order Graph"/>
                 <action name="%(simple_dashboard.action_sale_order_pivot)d" string="Sale Order Pivot"/>
               </column>
           </board>
       </form>
   </field>
</record>
create a record in model ir.ui.view. Specify the name of the record. To display the dashboard, we will use the board. board model. Set the record type as a form. We have added a string name for the dashboard inside the arch, which is displayed at the top of the dashboard. For the board tag, we can specify the dashboard-style, such as how the various views should be grouped in the dashboard. There are several dashboard styles available: *1*, *1-1*, *1-1-1*, *1-2*, and *2-1*.
Dashboard layouts
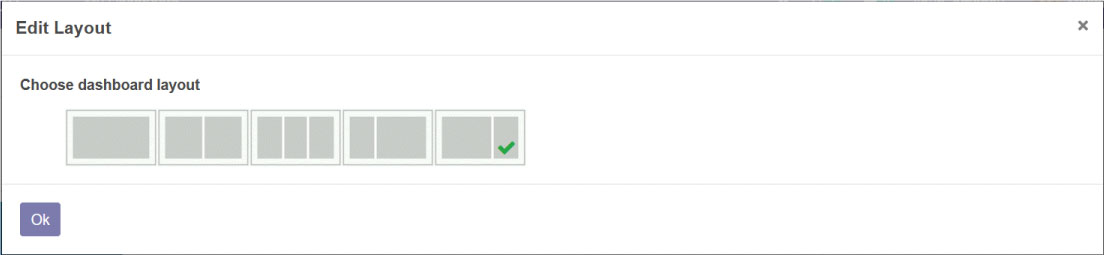
We can see an example of the dashboard layouts in the above screenshot.
To start with the dashboard, we’ll use the 1-1 layout. As we are using a two-section layout, we will have to create two columns for the view, and in each column, we will need to refer to the actions we have defined earlier. Call the calendar action inside the first column tag.
<action name="%(simple_dashboard.action_sale_order_calendar)d" string="Sale Orders"/>

A name will be determined by the ID of the act_window on top of the calendar and a string which appears with the calendar view.
Also, in the following column tag, call the two actions defined above for the other two views.
<action name="%(simple_dashboard.action_sale_order_graph)d" string="Sale Order Graph"/>
<action name="%(simple_dashboard.action_sale_order_pivot)d" string="Sale Order Pivot"/>
Next, define the action that opens the dashboard.
For that, define an action record with name, res_model as the board. Board, view_mode as form and usage as menu. After that, for the view_id, set the ref as the id of the dashboard view which we have defined on top.
Next, let’s define the menu item for the dashboard action just created.
<menuitem
   name="Sales Dashboard"
   parent="sale.sale_menu_root"
   action="open_simple_dashboard_action"
   sequence="1"
   id="dashboard_menu"
/>
We have given the name for the menu item, parent as sale.sale_menu_root as we are creating the dashboard for the sales, action as the id of the dashboard action and the sequence and id for the menu item.
This is the overall code for creating the simple dashboard using the board. board model.
<odoo>
   <record id="action_sale_order_graph" model="ir.actions.act_window">
       <field name="name">Sale Order Graph</field>
       <field name="res_model">sale.order</field>
       <field name="view_mode">graph</field>
       <field name="view_id"
ref="sale.view_sale_order_graph"/>
   </record>
   <record id="action_sale_order_calendar" model="ir.actions.act_window">
       <field name="name">Sale Order Calendar</field>
       <field name="res_model">sale.order</field>
       <field name="view_mode">calendar</field>
       <field name="view_id" ref="sale.view_sale_order_calendar"/>
   </record>
   <record id="action_sale_order_pivot" model="ir.actions.act_window">
       <field name="name">Sale Order Pivot</field>
       <field name="res_model">sale.order</field>
       <field name="view_mode">pivot</field>
       <field name="view_id" ref="sale.view_sale_order_pivot"/>
   </record>
   <record model="ir.ui.view" id="simple_dashboard_view">
       <field name="name">Simple Dashboard</field>
       <field name="model">board.board</field>
       <field name="type">form</field>
       <field name="arch" type="xml">
           <form string="My Dashboard">
               <board style="1-1">
                   <column>
                     <action name="%(simple_dashboard.action_sale_order_calendar)d" string="Sale Orders"/>
                   </column>
                   <column>
                     <action name="%(simple_dashboard.action_sale_order_graph)d" string="Sale Order Graph"/>
                     <action name="%(simple_dashboard.action_sale_order_pivot)d" string="Sale Order Pivot"/>
                   </column>
               </board>
           </form>
       </field>
   </record>
   <record model="ir.actions.act_window" id="open_simple_dashboard_action">
       <field name="name">My Dashboard</field>
       <field name="res_model">board.board</field>
       <field name="view_mode">form</field>
       <field name="usage">menu</field>
       <field name="view_id" ref="simple_dashboard_view"/>
   </record>
   <menuitem
       name="Sales Dashboard"
       parent="sale.sale_menu_root"
       action="open_simple_dashboard_action"
       sequence="1"
       id="dashboard_menu"
   />
</odoo>
Sales Management
After installing the module, going to Sales Management, we can then see the simple dashboard for the sales.
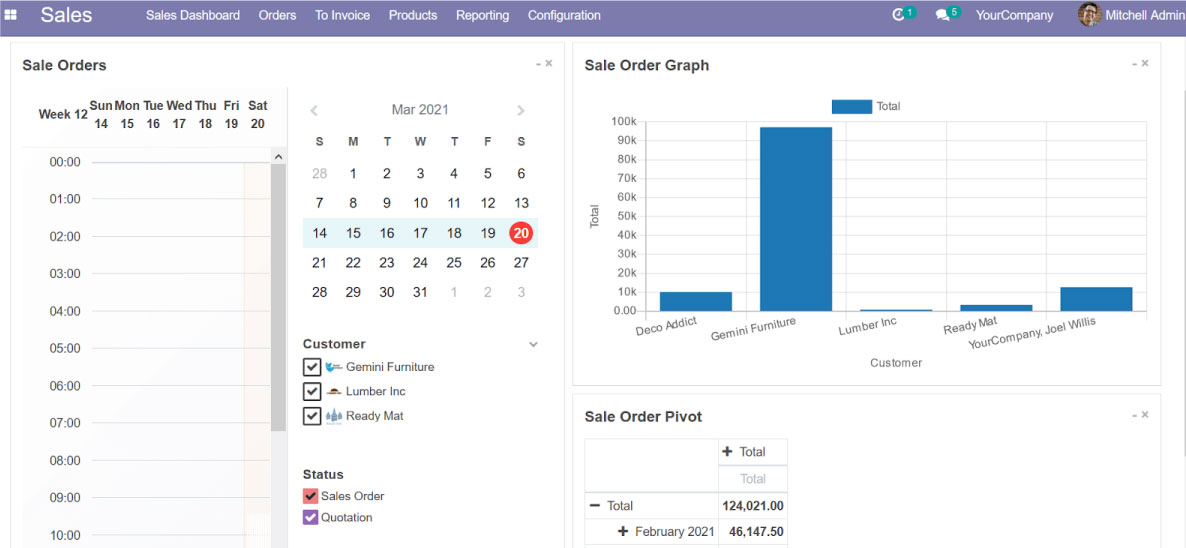
This is how we can create a dashboard for our modules using no JavaScript functions.
"Unlock the Full Potential of Your Business with Odoo ERP!"
"Get a Cost Estimate for Your ERP Project, Absolutely FREE!"
Get a Free Quote