How to Create SQL view in Odoo 15

Difference between Table and View in SQL
SQL stores data in a database in the form of rows, and columns called the table. The data from a table can be retrieved using SQL queries. A table has related data for which the table was initially created. The table is stored in the database.
A view is a query that contains data from multiple tables joined using SQL queries arranged in table format. The view is not stored in the database; whenever the data is to be viewed, the related query to generate the view is run. This is useful when a set of data is frequently required but requires data from multiple tables to be joined together.
SQL view in Odoo
As mentioned in the previous section, when a set of data from multiple database tables has frequently required. A view can be used as it is much faster than the ORM search methods in handing data from multiple tables as ORM searching can take more time.
Creating SQL view in Odoo 15
Odoo uses SQL queries to get data from the database and uses the views in Odoo to display the data. We will create a view in Odoo mostly it is a tree view as it resembles the table layout in which SQL returns data and since it is easier to interpret multiple data from multiple records.
Create the model as normally you create for Odoo, just that an additional _auto=False is added in the model definition.
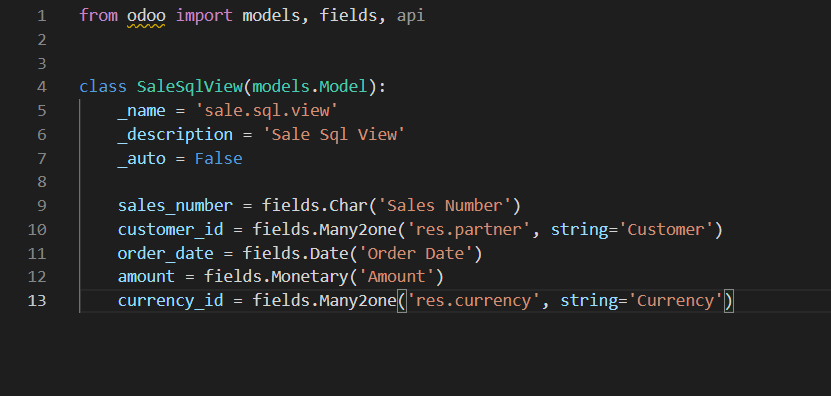
_auto = False is given in the model definition to specify that notable needs to be created for this model in the database.
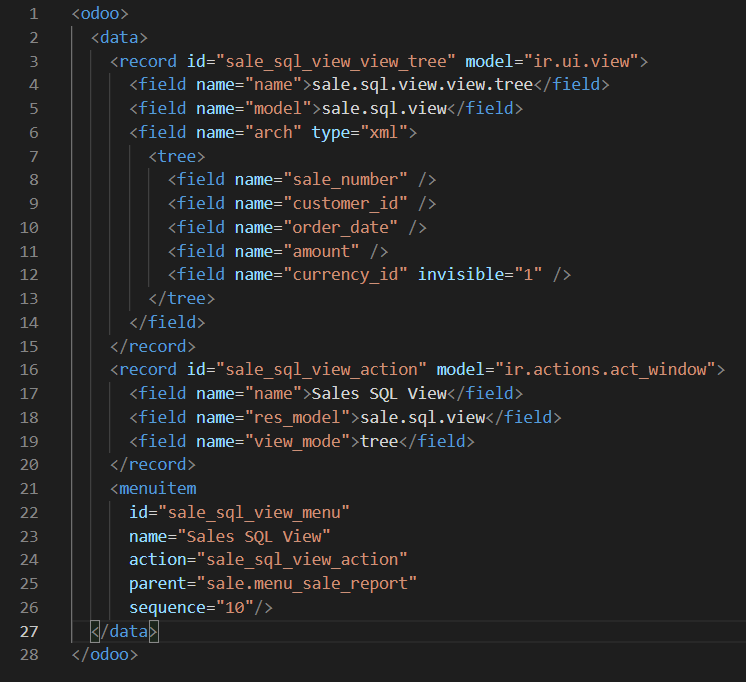
Creating the view for the user needs to create a tree view, an action, and a menu item, as usually done when creating views for the models in Odoo.
Since the view is set up next step is to write the query to generate the view. The query is written inside the init() function as it is the first one to be executed when the view is called upon by clicking the corresponding menu item.
init() function is used to specify the SQL query because it is the first one to execute when a module is loaded.
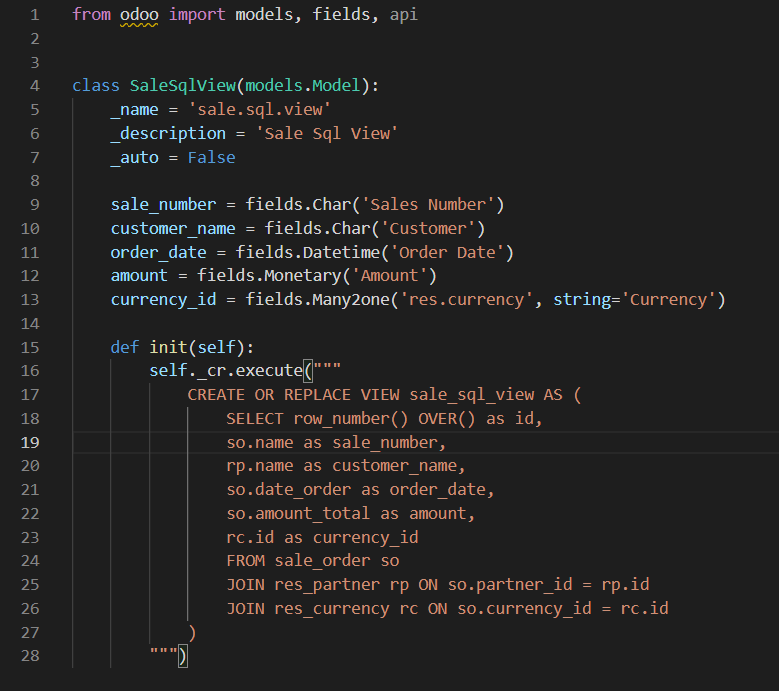
Our main SELECT query is written inside the CREATE OR REPLACE VIEW command so that if the view already exists, then we need to replace that view with the view that is going to be created now.
The above-mentioned query will return the selected values from the database and load them to our view.
To open the view for the SQL view, navigate to Odoo and click the menu item for the view.
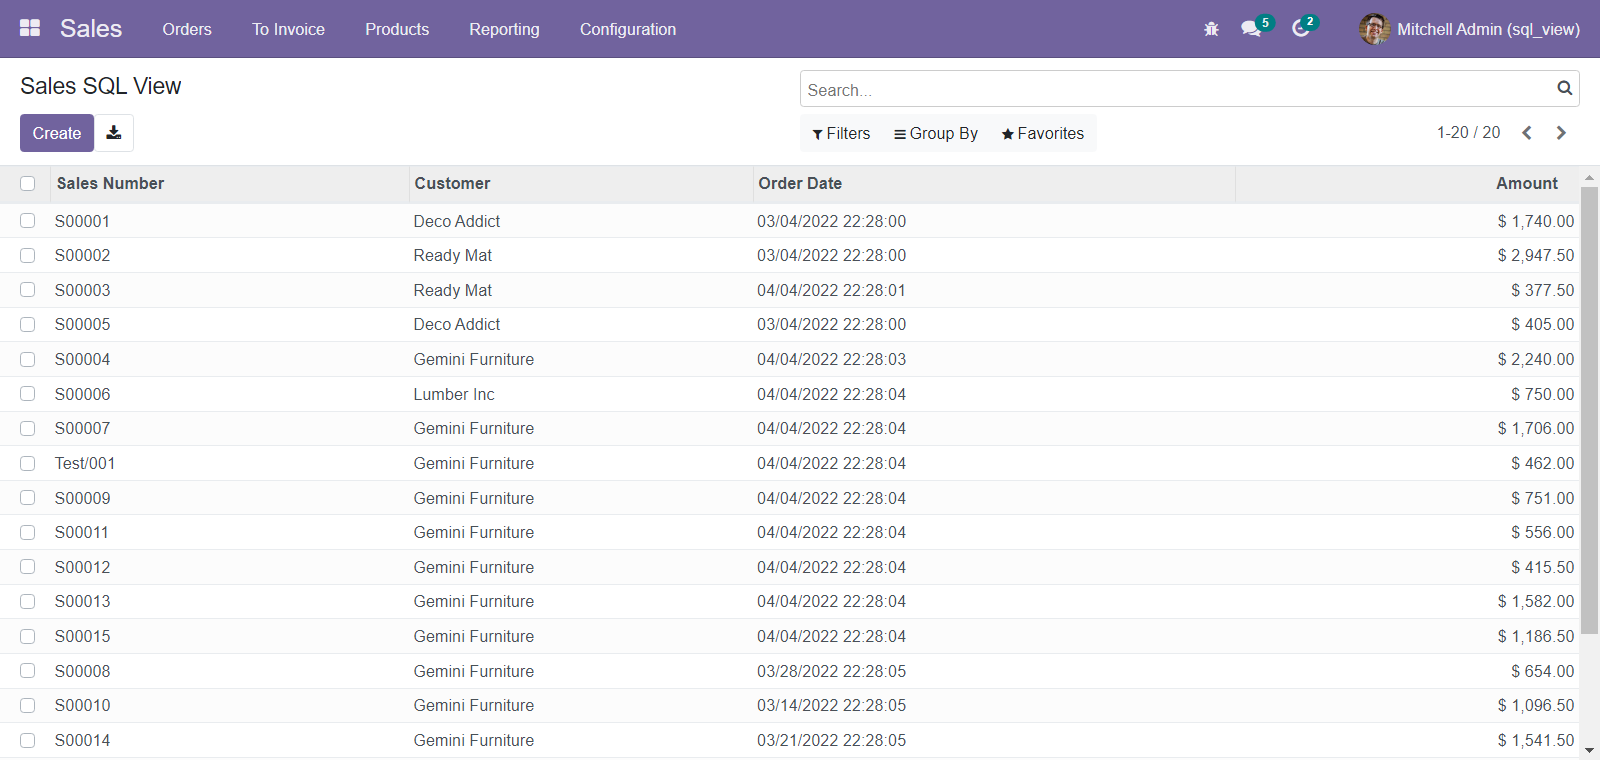
This view is read-only; the user cannot click and view the form view as it is just a view and does not have a form view.
Using this method, users can create views according to their requirements to make views from multiple tables in the database, get better insights into data, and make better decisions.
Since these SQL views are faster than Odoo ORM methods, users can get the results faster when many tables are involved, thus saving time.
If you plan a new ERP Software implementation and you have heard about Odoo and got attracted by the Odoo ERP platform, decided to use it but don’t have time, resources, or knowledge to manage this yourself, thereby looking for professional assistance, then you have come to a right place. Bassam Infotech has implemented scores of Odoo ERP all around the world. In addition, we have also developed and delivered our own customized Odoo applications with minimal Odoo implementation cost.
DOWNLOAD odoo
Bassam Infotech is a company of Official Odoo Certified Experts with 24 years of expertise. We are a one-stop shop for all your business needs, including Odoo Implementation, customization, integration, and support. We’re available by phone or email, with a 24-hour response time in case you need immediate Odoo ERP support. For more details, Call us on +91 88912 49995 or +91 70250 75566 email us at info@bassaminfotech.com or fill out the form to get a free consultation
"Unlock the Full Potential of Your Business with Odoo ERP!"
"Get a Cost Estimate for Your ERP Project, Absolutely FREE!"
Get a Free Quote